Liste der Anhänge anzeigen (Anzahl: 4)
[Anleitung] Root für das Google Nexus 7 (2013) *04.09.2013*
[Nexus 7 2013 TOOLKIT V1.0.2] Drivers, Backup, Unlock, Root, Recovery, Flash + MORE
Mit dem Toolkit von den XDA's habt ihr euer Nexus 7 (2013) in wenigen Minuten sicher gerootet und anschliessend alle bekannten "Annehmlichkeiten" auch auf eurem neuen Nexus 7 zur Verfügung:
http://forum.xda-developers.com/show....php?t=2430708
SUPPORTS BOTH WI-FI ONLY AND GSM/HSPA+/LTE MODELS
FUNCTIONS OF GOOGLE NEXUS 7 2013 TOOLKIT V1.0.2 [4TH SEPTEMBER 2013]
* Install correct adb/fastboot drivers automatically on Windows xp/vista/7/8 32bit+64bit
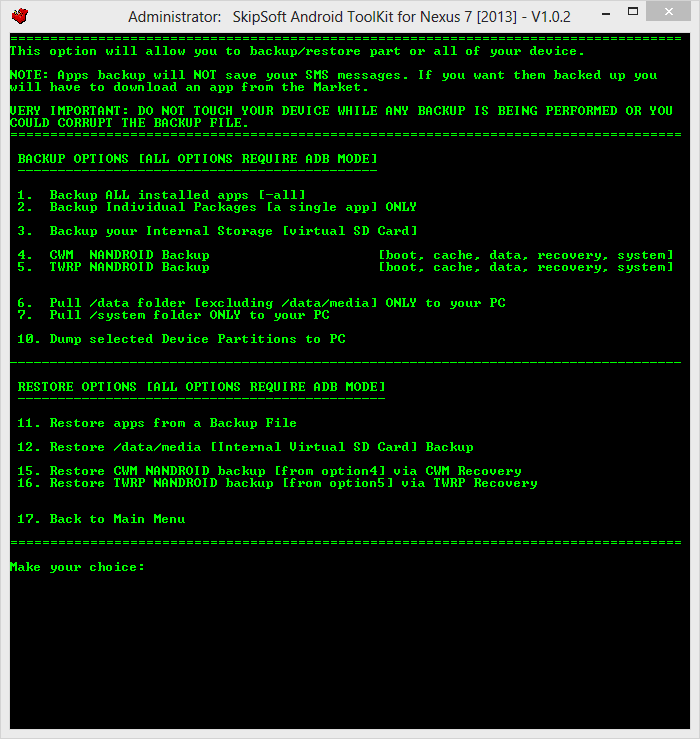
* Backup/Restore a single package or all apps, user data and Internal Storage
* Backup your /data/media (virtual SD Card) to your PC for a Full Safe backup of data
* Unlock/Re-Lock your Bootloader
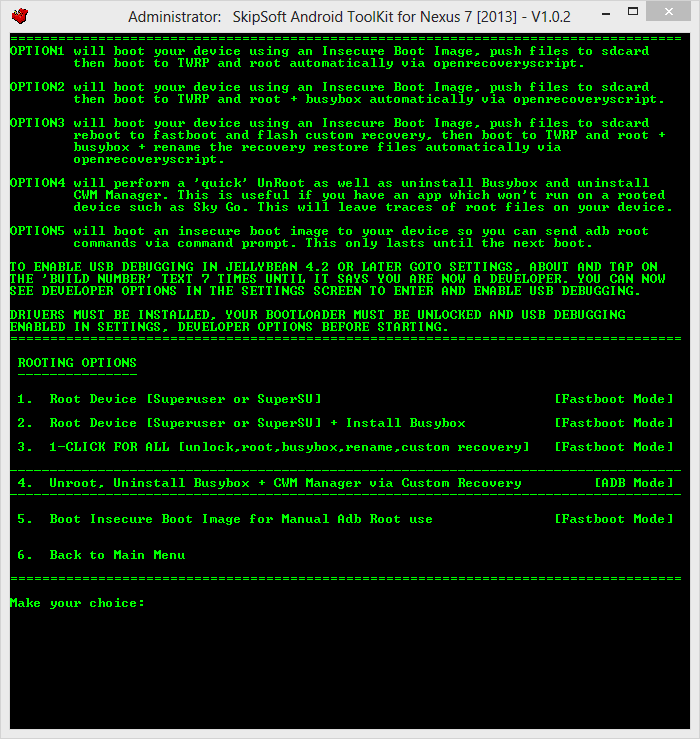
* Root Stock Jelly Bean builds (upto 4.3.0)
* 1-Click For All to Unlock, Root, Rename the Restore File
* Perform a FULL NANDROID Backup of your system (Boot, Cache, Data, Recovery and System) via adb and save in Custom Recovery format on your PC which can be Restored via CWM Recovery
* Pull /data and /system folders, compress to a .tar file and save to your PC
* Dump selected Phone Partitions, compress to a .zip file with md5 and save to your PC
* Install BusyBox on your phone
* Extras, Tips and Tricks section (professional only feature)
* Auto Update ToolKit to latest available version at startup (professional only feature)
* Program up to 10 Quickpick slots and run them very quickly (professional only feature)
* Mods section to automatically perform certain tasks on your phone
* Download Google Stock Image directly to correct ToolKit folder for extracting and flashing (no need to move it manually anymore)
* Check md5 of stock image to make sure downloaded file isn't corrupted before flashing
* Flash Custom Recovery or Google Stock Image to phone
* Rename the Recovery Restore File present on some Stock Roms
* Boot into CWM Touch, TWRP or Stock Recovery without Flashing it
* Boot or Flash .img Files directly from your PC
* Install a single apk or multiple apk's to your phone
* Push Files from your PC to your phone
* Pull Files from your phone to your PC
* Dump selected LogCat buffers to your PC
* Dump BugReport to your PC
* Set Files Permissions on your phone
* Open new Command Prompt for manual input
* Reboot Phone to Fastboot Mode or Android from fastboot mode
* Reboot Phone to Fastboot Mode, Recovery, Android or Download Mode from adb mode
* Display Important Information about your device
* Auto mode detection to put your device in the correct mode before performing a procedure
NOTE2: As the ToolKit.exe and ModsSection.exe files are not Digitally Signed with a Microsoft Certificate they 'may' get picked up as potentially harmful by Antivirus Programs and deleted on first run. If this happens restore the file and exclude it from future scans to use it. This seems to happen mostly on AVG Free and Norton which is why I switched to BitDefender which is much better.
--------------------------------------------------------------
Anhang 136064
Anhang 136065
Anhang 136066
Anhang 136067
--------------------------------------------------------------
1. INSTALLING ADB/FASTBOOT DRIVERS
The first thing you need to do is to install the adb/fastboot drivers. These are needed so that you can unlock your bootloader, root your phone and perform other adb/fastboot functions.
THE DRIVERS CAN NOW BE INSTALLED DIRECTLY VIA THE TOOLKIT. OPTION 1 IN THE MAIN MENU.
IF YOU HAVE ANY TROUBLE WITH THE TOOLKIT INSTALLING THE DRIVERS PLEASE POST IN THIS THREAD WITH YOUR OPERATING SYSTEM VERSION AND ERROR MESSAGE.
a. If you dont want to use the ToolKit to install the drivers then the best best drivers to try are PdaNet for Android, download and run the 32-bit Windows 7/Vista/XP or 64-bit Windows 7/Vista and follow the instructions to install.
b. After the drivers have been installed disconnect the usb cable and shut down your phone. Keep holding the 'Volume Up' and 'Volume Down' buttons and press the 'Power' button to boot the phone into FastBoot Mode.
c. Goto your Control Panel on your PC and open the Device Manager. You want this open so you can see the FastBoot driver is installed or so you can install it manually.
d. Connect the usb cable. In the Device Manager a new item called 'Android 1.0' should pop up and then the driver should install automatically. Once it is installed you will have a new section in the Device Manager called Android Phone without an "!" meaning its installed correctly.
MAKE SURE YOU ENABLE USB DEBUGGING IN SETTINGS, DEVELOPER OPTIONS BEFORE CONNECTING THE USB CABLE IN ADB MODE SO THAT THE PC CAN DETECT THE PHONE PROPERLY.
Note 1: If the driver doesnt install automatically then double click on the Android 1.0 item, then click on the driver tab and select 'update driver'. Select 'browse my computer' and browse to the Google Nexus 7 ToolKit\driver folder. Make sure sub folders is ticked. Drivers should then be installed correctly.
--------------------------------------------------------------
2. USING MSKIPS' NEXUS 7 TOOLKIT
a. Download the Nexus 7 [2013] ToolKit package and install the ToolKit to your PC (to the default location if possible). The installation will create a Shortcut on your desktop called 'Nexus 7 [2013] ToolKit' for easy access. You have the option to include or exclude the drivers files at installation so if you already have your drivers set up and are just updating the ToolKit then you can untick the drivers if you wish.
b. Once the ToolKit is installed make sure your phone is booted and plugged in via USB cable and double click on the shortcut on your desktop to run it. If running the file directly please use the toolkit.exe file to start the Toolkit and not the tkmain.exe file or it may not work properly.
c. You will be asked if you want to check for an Update. If you type 'yes' this will download and check the latest version numbers against the versions in the ToolKit. If there is an update available then you will have the option to download and install it (professional only feature).
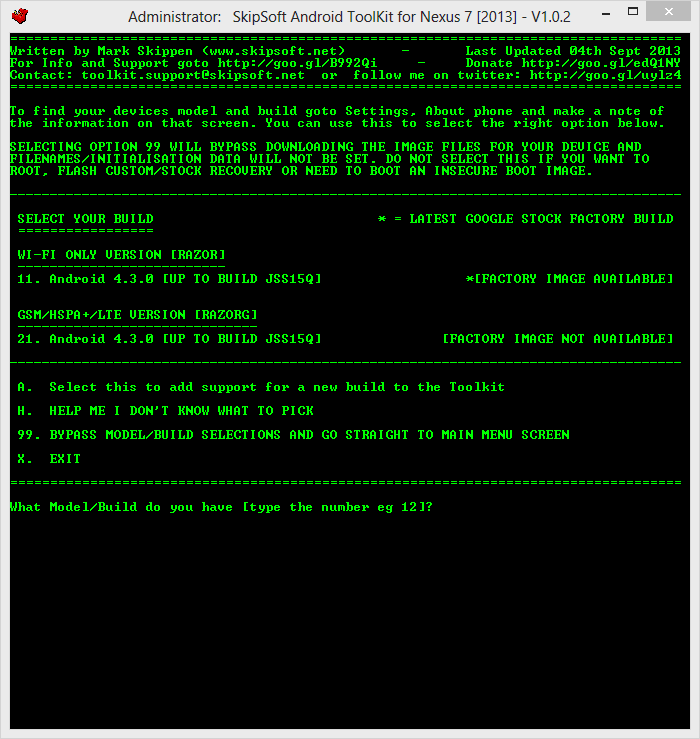
d. You will now be presented with a Model Selection Screen to choose the Model/Build that you are currently on. Type the number that corresponds to your desired selection. For example type '11' for WIFI ONLY MODEL [RAZOR] 4.3.0 [Up to Build JSS15Q]. If you cannot find the build your device is using then type 'h' to select the HELP option to get more info.
NOTE1: If you have a new build that isnt covered by the Toolkit you can also type 'a' in the Model Selection screen to see instructions on how to pull your stock image and send it to firmware.support@skipsoft.net so support can be added.
NOTE2: You can also type 00 on the Model Selection screen to go straight to the activation screen so you can type your code and upgrade to the Professional version.
e. The Toolkit will now locate and download the image pack for your chosen Model. This is a new feature so the Toolkit is not limited to how many Models can be added and it cuts down ALOT on the download size. After the zip file has finished downloading it will be extracted to the correct folders and the files checked to make sure everything is ok. If you cannot download the pack via the Toolkit then you can download it manually from http://goo.im/devs/mskip/toolkit/goo...13/model_files and extract the 2 folders to your installation folder.
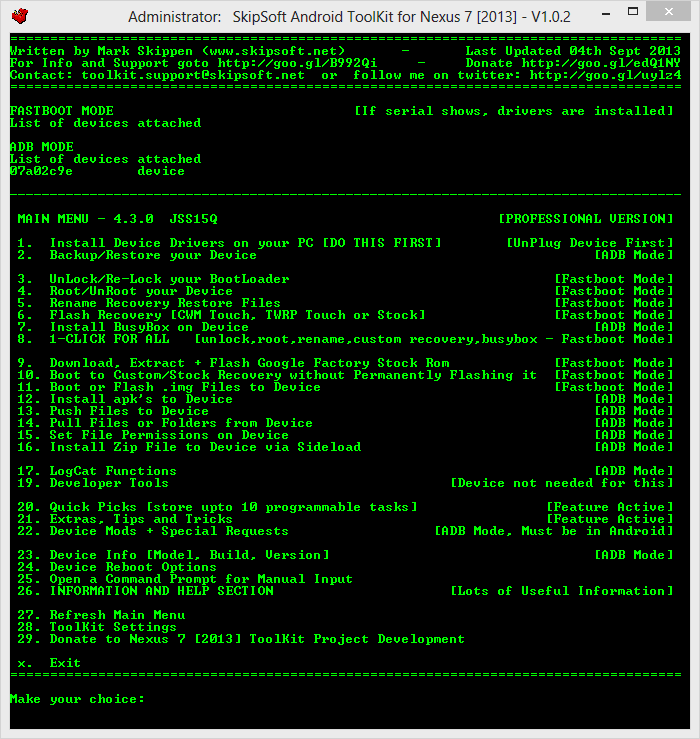
f. When you enter the Main Menu you will see 'Adb Mode' and 'Fastboot Mode' at the top. If you have installed your drivers correctly then you will see your devices serial number under the text with 'device' next to it for the mode you are in. If you see this then your device is connected and you can carry on.
NOTE: If you haven't installed the drivers and don't see a serial number at the top then this is the FIRST thing you want to do so the Toolkit can operate properly. You may need to do this in adb and fastboot mode.
g. Each option in the ToolKit has full information on what it is and how to use it.
--------------------------------------------------------------
USEFUL INFORMATION
How to get into your FastBoot Mode
1. Turn your phone off
2. Unplug your usb cable if you have one plugged in
3. Keep holding the 'Volume Down' button and press the 'Power' button to boot the phone into FastBoot Mode
How to get into Custom Recovery
1. First boot into FastBoot Mode as described above
2. Scroll down with the 'Volume Down' button until it says 'Recovery mode' at the top and press the 'Power' button to enter Recovery
Show the Menu in the Stock Recovery Screen
1. Hold the Power button and keep holding as you press the Volume Up button. The blue recovery menu screen should pop up.
Credits: ChainsDD for Superuser, Chainfire for SuperSU, koush and the clockworkmod team for cwm and the universal driver pack, 1wayjonny for the adb/fastboot driver pack
Ein ganz grossen Danke gebührt an dieser Stelle dem XDA-Senior Moderator und Developer @mskip, welcher der Community hiermit einen grossen Dienst erwiesen hat!
Für eine kleine Spende von GBP 4.00 gibt es zudem die Möglichkeit weitere "Professional-Features" freizuschalten! :)
ACTIVATING THE PROFESSIONAL VERSION ADDS THE MOST USEFUL FUNCTION IN THE TOOLKIT, THE ABILITY TO CHECK FOR 'AUTO UPDATES' DIRECTLY VIA THE TOOLKIT AND HAVE THEM PUSHED TO YOUR PC RIGHT AWAY AS SOON AS THEY ARE UPLOADED WITHOUT NEEDING TO DOWNLOAD THE WHOLE TOOLKIT EVERY TIME. YOU WILL ALWAYS HAVE THE LATEST VERSION AS SOON AS IT IS MADE AVAILABLE. THIS MEANS SMALLER UPDATES CAN BE SENT OUT MORE FREQUENTLY, SUCH AS ADDING A SINGLE FUNCTION, FIXING A BUG OR ADDING COMPATIBILITY FOR A SINGLE CARRIER. THE SMALLER UPDATES WILL BE COMPILED AND RELEASED TO THE XDA COMMUNITY AS A FULL (PUBLIC) DOWNLOAD VERSION SO PROFESSIONAL VERSIONS ARE ALWAYS UPDATED SOONER.
THE 'EXTRAS' SECTION WILL CONTAIN BROWSER TIPS, GENERAL TIPS, KEYBOARD TIPS, MARKET TIPS, SCREEN TIPS, SECURITY TIPS AND SETTINGS TIPS AS WELL AS A FEW TRICKS YOU CAN DO WITH YOUR DEVICE.
THE 'QUICK PICKS' SECTION ALLOWS YOU TO PROGRAM UPTO 10 SLOTS WITH TASKS THAT YOU MAY PERFORM ON A REGULAR BASIS OR JUST WANT TO KEEP A SET OF TASKS IN 1 PLACE. THEN JUST SELECT THE SLOT AND IT WILL REMEMBER ALL YOUR SETTINGS FOR THAT TASK AND RUN IT.
AW: [Anleitung] Root für das Google Nexus 7 (2013) *04.09.2013*
Für User der Pro-Version steht seit gestern Abend innerhalb der Anwendung ein Update auf v1.0.4 zur Verfügung! :cool:
Root und CWM bleiben übrigens auch nach der Installation eines offiziell ausgerollten Updates erhalten! :top: